

This amazing stuff is found in local craft stores. I buy mine from Amazon, it's cheaper and fast to ship. I'm a terrible seamstress at best and this has changed my crafting life. It's totally non-judgey and makes everything you do look good. It's the prefect best friend. It bonds fabrics to each other so that if you don't want to sew them, fine! If you want to go around the edges and add a bit of stitching, have at it, Pellon will hold everything still so you don't have to pin anything! Dreamy. You're welcome.
Today I finished up this cute Mickey Pirate Shirt
.jpg)
Materials: 1 yard of black material
1.5 yards of Pellon
0.5 yards of pirate fabric ( I used stripes)
0.5 yards of fabric for the letter ( I used white)
An iron
Shirt
Mickey Head Outline
Since this one is for my Little, I grabbed a plain onsie, the kind that come in a pack. I didn't even wash it first. Print out this Mickey Head Outline and cut it down to the size you need. If you are fancy I hear your computer can size it before you print, but "ain't nobody got time for that" I only have naptime to get this done!
Take a square of your black fabric large enough to fit your Mickey Head and lay it on a coordinating piece of your Pellon. You want the rough side of the pellon touching your fabric.

Flip the whole thing over so that the smooth Pellon is on top ( it feels like wax paper) and iron that sucker down. It takes holding the iron in place for a few seconds. After it's good and attached, trace your Mickey Head onto the back of your Pellon. Cut it out.


It may snag and not be perfect, that's ok.

Lay your Mickey onto your onsie with the Pellon touching your shirt and iron again. Make sure you focus on the edges.

Now repeat the Pellon process with your pirate fabric for the bandanna. Lay a small square over the Pellon and iron. Pay attention to how the stripes or pattern will end up so that it looks correct on Mickey. Lay your Mickey Head onto the smooth side and just trace between his ears and draw a tail.


Fill in the rest of the pattern freehand.


Cut out your bandanna, peel the backing off and lay it over your black Mickey Head. Iron it directly on top.

I didn't take pictures of this part but for the letter I just printed out an enlarged letter from Microsoft Word. I probably made it bold too. Then I followed the same process as above with Pellon, tracing, cutting and ironing. Here it is before I sewed it.
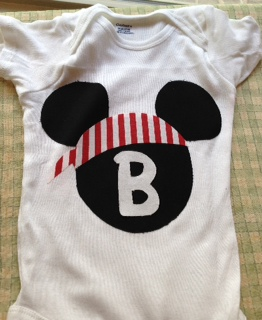
You could stop here if you don't like to sew, but I like the finished look and extra security that stiching gives the shirt. So I just whipped the whole thing through my machine, the Pellon held everything still while I zipped around the outside (no need to pin anything down), and it's done! Now my Little will match my Middle and Big!

If you liked this post, check out other Shirt posts! Chevron Disney Shirts
No comments:
Post a Comment