Be Their Guest Disney Blog

main street stay play dine the hub Image Map
Showing posts with label shirts. Show all posts

Friday, September 20, 2013

DIY Pirate Mickey Shirt

As we finish prep for our latest trip to Disney (just 4 more sleeps!), be prepared for cuteness and tutorial overload. While Jason's favorite parts about Disney are strategy and spreadsheets for the parks, mine is forced family matching and cute shirts. I often get comments when we wear them from people expressing that they wish they could make some for their kids but they don't sew/have time/ know where to start.  Here is the answer my friends: Pellon, also known as Under Wonder.


This amazing stuff is found in local craft stores. I buy mine from Amazon, it's cheaper and fast to ship. I'm a terrible seamstress at best and this has changed my crafting life. It's totally non-judgey and makes everything you do look good. It's the prefect best friend. It bonds fabrics to each other so that if you don't want to sew them, fine! If you want to go around the edges and add a bit of stitching, have at it, Pellon will hold everything still so you don't have to pin anything! Dreamy. You're welcome.

Today I finished up this cute Mickey Pirate Shirt


Materials: 1 yard of black material
                 1.5 yards of Pellon
                 0.5 yards of pirate fabric ( I used stripes)
                 0.5 yards of fabric for the letter ( I used white)
                 An iron
                 Shirt
                Mickey Head Outline

Since this one is for my Little, I grabbed a plain onsie, the kind that come in a pack. I didn't even wash it first. Print out this  Mickey Head Outline and cut it down to the size you need. If you are fancy I hear your computer can size it before you print, but "ain't nobody got time for that" I only have naptime to get this done!

Take a square of your black fabric large enough to fit your Mickey Head and lay it on a coordinating piece of your Pellon. You want the rough side of the pellon touching your fabric.


Flip the whole thing over so that the smooth Pellon is on top ( it feels like wax paper) and iron that sucker down. It takes holding the iron in place for a few seconds. After it's good and attached, trace your Mickey Head onto the back of your Pellon. Cut it out.


One side will be black fabric, the other will be smooth, white, wax paper-esq Pellon. Peel the Pellon backing off.


It may snag and not be perfect, that's ok.

Lay your Mickey onto your onsie with the Pellon touching your shirt and iron again. Make sure you focus on the edges.

Now repeat the Pellon process with your pirate fabric for the bandanna. Lay a small square over the Pellon and iron. Pay attention to how the stripes or pattern will end up so that it looks correct on Mickey. Lay your Mickey Head onto the smooth side and just trace between his ears and draw a tail.


Fill in the rest of the pattern freehand.


Cut out your bandanna, peel the backing off and lay it over your black Mickey Head. Iron it directly on top.


I didn't take pictures of this part but for the letter I just printed out an enlarged letter from Microsoft Word. I probably made it bold too. Then I followed the same process as above with Pellon, tracing, cutting and ironing. Here it is before I sewed it.
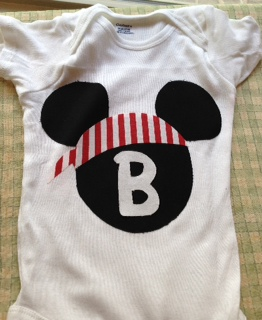


You could stop here if you don't like to sew, but I like the finished look and extra security that stiching gives the shirt. So I just whipped the whole thing through my machine, the Pellon held everything still while I zipped around the outside (no need to pin anything down), and it's done! Now my Little will match my Middle and Big! 


If you liked this post, check out other Shirt posts! Chevron Disney Shirts


Tuesday, August 6, 2013

DIY Disney Shirts and Discount Code and Contest, Oh My!

I have a confession to make.  I love making my family wear matching Disney gear during our vacations.  They (for the most part) enjoy it too and it adds to the magical feeling of being at Disney. I stumbled across Mockingbird Monograms on Etsy and her cute chevron Mickey Ears iron on transfer and fell in love! This could not be easier.  You pick your design, tell her your initials, and she uses pixie dust (and email) to send your creation to you!  I recently did some shirts for a friend's girls who are heading to Disneyworld soon using Mockingbird Monograms transfers and they were adorable. BONUS, just for our readers, you get 50% off a transfer! Just type the code GUEST at checkout!


Materials: Iron, t-shirt, transfer paper, transfer, ink jet printer

***Note about transfer paper: The color of shirt you have will determine the type of transfer paper you buy. If it is a dark shirt, look for the transfer paper that says " for darker shirts". Likewise if the shirt is light, it will say " for light or white shirts". Easy peasy. Our shirt was white and we bought Avery T-shirt Transfersfrom Amazon for about $8. It comes with several sheets. ***

Step One: Order
Head over to Mockingbird Monograms and choose your design. Use a special discount code GUEST and get 1/2 off!

Step Two: Open
Mockingbird Monograms will send your transfer to you via email, open it and it will look like this ( in Windows Photogallery). All you have to do is print it out!
.


Step Three:Print
Make sure you read the instructions on your transfer paper to determine if you need to print a regular print or a mirror image print. Here is the transfer paper we used and our print out. You must use an ink jet printer.


Step Four:Trim
Cut around the design as closely to the edge as possible. I didn't get a picture of this but I cut around the outside red circle. 

Step Five:Iron
Simply lay the design on the shirt (follow instructions for your specific transfer paper) and use a hot iron to secure it.  I usually start with the edges and press firmly for about 10 seconds before moving on to a new spot. In all it takes about 60 seconds to iron on - How easy is that??


Step Six:Peel
Let the shirt cool for a few min and then find an edge of the top paper to start peeling.  Slowly peel away the protective paper and ta-daa! super cute personalized Disney shirt!


Contest now closed
 
So now you can make your own Chevron Mickey Shirt! Or even easier, WIN ONE! We will give away one personalized Chevron Mickey Ears shirt thanks to our friends at Mockingbird Monograms! So many ways to enter! For each of the following, you'll get one entry.
 
1. Leave a comment telling us your favorite place at Disney.
2. Start following us
3. Pin this post ( and comment saying you did)
4. Link us on your blog (and comment saying you did)
 
Don't forget to leave your email in the comments. Contest ends Monday August 5, 2013 at 7:00 pm CST.
 
Congratulations to Lynn B. who was the winner of our T-shirt contest. We'll get her information and send the shirt out right away. Stay tuned for future contests. Thanks for everyone who entered!
 

Happy Disney Crafting!!